Booklet Design Guide
How to Design a Booklet: 4 Tools Tested (2026 Guide)
A practical guide to booklet design — from page format to press-ready file.
Most guides that promise to teach you how to design a booklet actually teach you how to print one. They walk you through a fold setting and stop. But when we looked at what people say after they finish a booklet, the complaints are almost never about a missing button — they are about the result: it came out looking like a coloured document, not like something that was designed. That gap is what this guide is about.
We looked at the top-ranking results for booklet design across Canva, Word and InDesign searches, read what people actually ask in bookbinding communities, and reviewed feedback from several hundred booklets made on our own platform. This guide covers the four layers of booklet design, an honest comparison of four tools, and two worked examples — a magazine and a recipe booklet — with real interior pages, not mockups.
What does it mean to design a booklet?
Designing a booklet means deciding four things: the physical format (size, binding, page count), the content structure (cover, contents, section rhythm), the page layout system (grid, type scale, images, captions), and the prepress setup (bleed, imposition, resolution). Learning how to make a booklet is really learning these four layers — printing settings are only the last of them.
The 4 layers of booklet design
Almost every tutorial online covers layer 4 and calls it done. That is why so many finished booklets read as "a Word document with a colour on it". Here is the full stack, in the order you should actually work through it.
Decide the physical object first
Size and binding constrain everything after them, so settle them before you design a single page. The common booklet sizes are A4 (210 × 297 mm), A5 (148 × 210 mm — a folded A4 sheet) and US Letter. For binding, the four standard options are saddle stitch (folded and stapled through the crease — the default for booklets up to roughly 40–60 pages), perfect bound (a squared-off glued spine), spiral coil and wire coil (both lie completely flat, which matters for cookbooks and manuals you use hands-free).
The rule that catches most first-timers: with saddle stitch, your total page count must be a multiple of 4. One folded sheet produces four pages. There is no way around it — plan for 12, 16 or 20 pages, not 14.
Plan the sequence before the pages
A booklet is read in order, so structure is a design decision, not an afterthought. Map out the cover, an inside front page, a contents page if you have more than about 12 pages, then your sections — and decide the rhythm between them. Editorial booklets work best when full-bleed image pages alternate with dense information pages; a reader needs the visual pause.
Think in spreads (two facing pages seen together), not single pages. Once bound, nobody sees page 6 in isolation — they see 6 and 7 side by side.
This is the layer that decides whether it looks designed
When we reviewed reader feedback on hundreds of finished booklets, the largest single category of complaint was not a missing feature — it was that the output "felt like a brochure" or "looked like a slide deck" rather than a real publication. Layout problems (uneven columns, wasted space, no visual hierarchy) were the next biggest group. Together they dominate everything else, including image quality.
What separates the two is a small set of concrete devices:
- A column grid. Body text running the full width of an A4 page is the single clearest sign of a document. Two or three columns is what makes a page read as editorial.
- A restrained type scale. Two or three sizes with clear jumps between them. More than three typefaces is where amateur layouts go wrong.
- Pull quotes. A short line set large, breaking up a run of body text.
- Captions. Every image gets one. Uncaptioned photos read as decoration.
- Running feet and page numbers. Section name on one side, page number on the other.
- Deliberate white space, and brand consistency — the same fonts and colour palette on every page.
Make the file printable
Only now do print settings matter. Add 3 mm bleed on any image that runs to the edge, plus crop marks. Keep images at 300 DPI at final size — a 72 DPI screenshot that looks fine on screen will print visibly soft. Reserve a gutter (extra inside margin) so text is not swallowed by the binding. And confirm the imposition: for saddle stitch, page 1 is printed alongside the final page on the same sheet, which is why you cannot simply print pages in order and fold them.
One structural limitation worth knowing: any tool that works on a single-page canvas cannot produce a true spread. If you need an image crossing the centre fold, you need a tool that lays out facing pages together.
Digital vs print booklets
Before choosing a tool, settle whether the booklet will be printed, read on screen, or both — it changes which layers matter.
A digital booklet (shared as a PDF or a flipbook) needs no imposition, no bleed and no gutter. It can use RGB colour, live hyperlinks and lighter image files. A print booklet needs all four layers, and the prepress layer is unforgiving — mistakes there are only visible once you have paid for printing.
If you are doing both, design for print and export a second digital version. The reverse rarely works: retrofitting bleed and imposition onto a file designed for screen usually means rebuilding it.
4 ways to design a booklet, compared
There are four realistic ways to create a booklet, and we tested the same job on each: take existing written content and photos, and produce a 16-page A4 booklet. The differences are sharpest in two columns — whether the tool handles imposition, and whether it gives you an editorial layout without you building one by hand.
| Tool | Booklet imposition | Layout done for you | Learning curve | Best for |
|---|---|---|---|---|
| BookletAI | Yes — page order handled | Yes — grid, captions, pull quotes applied | Low | You already have the content |
| Canva | No — needs an external step | Partly — templates, but you place everything | Low | Short, visual, screen-first booklets |
| Microsoft Word | Yes — Book fold | No — single-column document flow | Low | Fold-and-staple printing, plain content |
| Adobe InDesign | Yes — Print Booklet | No — you build the entire system | High | Brand-critical print work |
Route A — How to design a booklet with BookletAI
This route is built for the case where the content already exists and the missing piece is the design. There are two starting points depending on what you have.
If you already have the material, use PDF to Booklet. It accepts PDF, Word, PowerPoint, Markdown, plain text and images. The content is restructured into booklet sections, illustrated, and laid out as A4 pages you can export for print.
If you are starting from a topic, use the AI Booklet Generator instead — you describe the subject and the content is researched and written before the same layout stage runs. For a fixed print format, the A4 Booklet Maker keeps page order print-ready from the start.
Either way, the layout layer is where the work happens: column grids, pull quotes, captions, running feet and issue lines get applied as a system rather than page by page.
One practical finding, from our own usage data
Booklets improve sharply with a few rounds of refinement. In sessions we reviewed, people who sent a single instruction and stopped rarely ended up with a finished booklet — around one in twenty. By the fourth exchange the completion rate rose to roughly three in four, and past five exchanges it was higher still. The lesson is simple: treat the first output as a draft to react to, not a final answer. Say what is wrong with it — "make the body text two columns", "the cover needs a stronger image" — and it converges quickly.
Route B — How to design a booklet in Canva
Canva is the most approachable of the four, and for a short, visual, screen-first booklet it is a reasonable choice. Create a multi-page design at your booklet's finished size (A5 if you plan to fold A4 sheets), start from one of the booklet templates, and apply the same margins and type styles across pages so the document holds together.
Where it breaks down is imposition. Canva does not impose pages for booklet printing. Its pages export in reading order — 1, 2, 3, 4 — but a saddle-stitched booklet needs them arranged so each printed sheet carries the correct non-sequential pair. This is not a hypothetical: in a long-running bookbinding thread from someone trying to design and print a 16-page booklet in Canva, every reply pointed the same way — export to PDF, then use Acrobat's booklet printing option or a separate imposition tool to reorder the pages.
So the honest workflow is: design in Canva, impose somewhere else. That is fine if you know it in advance, and a nasty surprise if you find out at the printer.
Route C — How to design a booklet in Word (and Google Docs)
Word has a genuinely useful feature here, and it is more capable than most people realise. The full path:
- Go to Layout > Margins > Custom Margins.
- In the Multiple pages dropdown, choose Book fold. The orientation switches to landscape automatically.
- Set Sheets per booklet. "All" puts everything in one booklet; choosing 4, 8, 12 or 16 splits a long document into separate signatures you bind together — the practical option for anything long.
- Increase the Gutter to reserve space for the binding.
- On the Paper tab, set the paper size. Your finished booklet will be half the width of the sheet — A4 paper gives an A5 booklet.
- To print: File > Print > Manually Print on Both Sides, flipping the sheets on the short edge so pages are not upside down.
Word imposes the pages for you, which is exactly the step Canva is missing. But notice what it does not do: Book fold is a layer-4 feature. It rearranges pages for printing and changes nothing about the layout. Your text is still a single-column document flow, and that is the direct reason booklets made this way tend to look like documents — because structurally they still are one.
What about Google Docs?
Google Docs has no equivalent of Book fold. You can set a custom page size and use two columns via Format > Columns, but there is no built-in imposition. Your options are a third-party add-on, or exporting to PDF and imposing with another tool — which puts Docs in the same position as Canva, with fewer design controls.
Route D — How to design a booklet in InDesign
InDesign is the professional tool, and it earns that on the layers everything else skips. You set up a document with facing pages, build a baseline grid and column guides, and put repeating elements — running heads, folios, section markers — on parent pages so they stay consistent. Text flows through linked frames across pages, so editing one paragraph reflows the rest instead of breaking the layout. When you are finished, Print Booklet handles imposition, and you export to PDF/X with bleed and crop marks for the printer.
The cost is real. Adobe's own published tutorial on making a booklet runs to five major sections and over twenty steps before you have a finished file — and that is before sourcing fonts and images. Add a subscription, and this is not a route you take for a one-off 16-page booklet.
Example 1 — Designing a magazine booklet
The job: a set of written pieces plus photographs, to become a magazine-style booklet. This is where the four layers show up most clearly, because a magazine that misses layer 3 is instantly recognisable as something else.
Below are two interior pages from a yearbook zine built with the magazine generator. Look at what is actually doing the work on the first one:
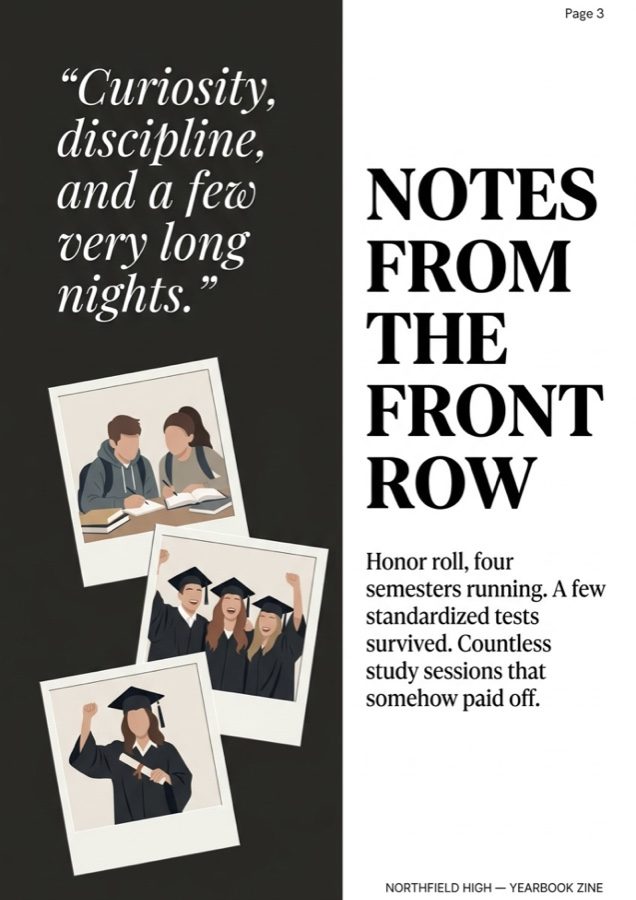
The second device is how images are handled. A page of loose photos becomes a designed page when the images are placed on a deliberate grid with a consistent frame treatment, and the page is labelled like part of a publication:
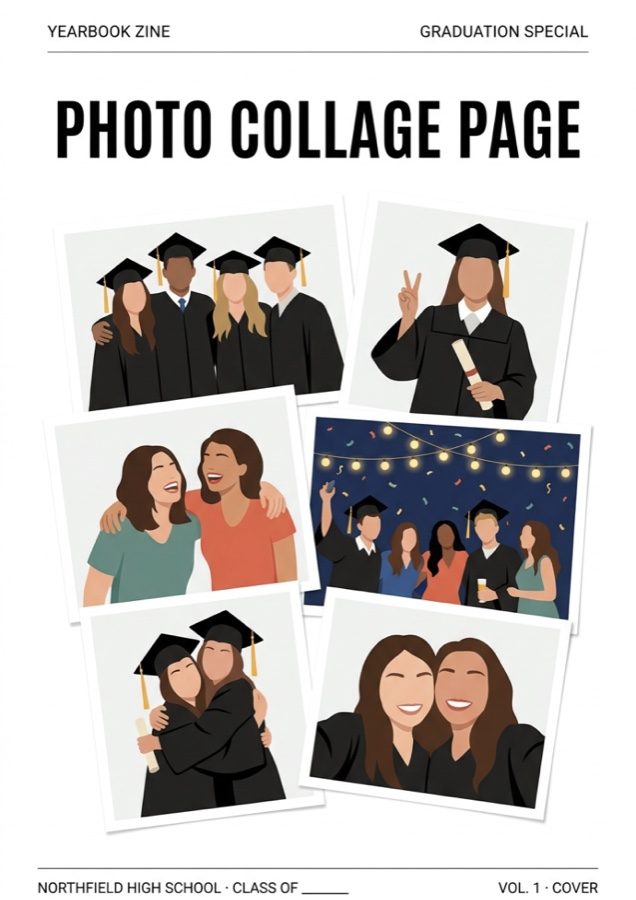
Notice what both pages have in common: a running head or foot, a page number, one dominant typographic element, and images that sit on a system rather than wherever they landed. Those are layer-3 decisions, and they are the difference the whole guide is about. If your articles and photos already exist, PDF to Booklet takes them as a document and applies a layout system like this one. You can see this booklet in full as The Last Bell — A Yearbook Zine.
Example 2 — Designing a recipe booklet
The job: a collection of loose recipes, to become a cookbook people can actually cook from. Recipe booklets have design constraints that magazines do not, and getting them wrong makes the booklet useless in a kitchen.
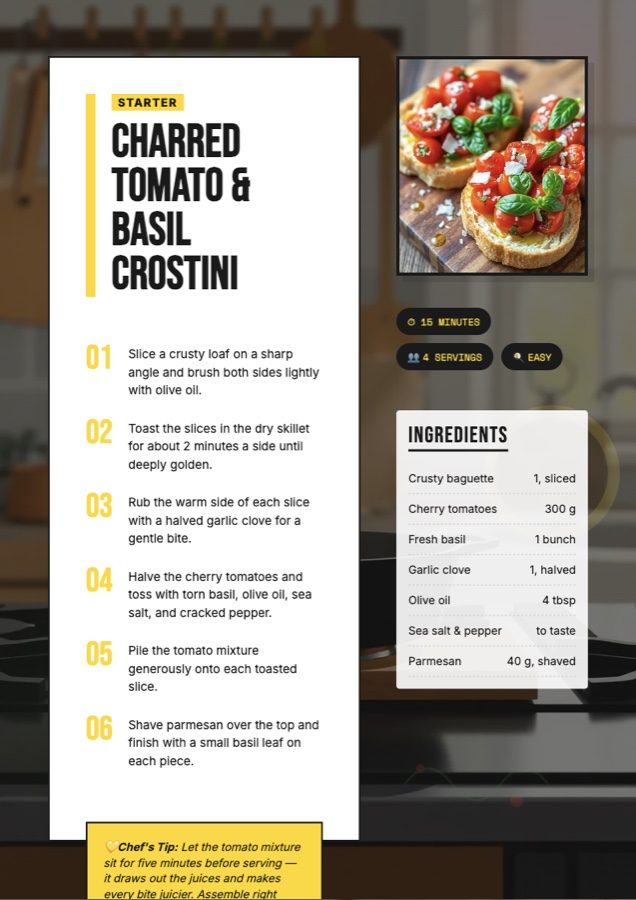
The core layout problem is that a recipe has two parallel streams — ingredients and method — and readers move between them constantly. Setting them as one continuous column forces the cook to scroll back and forth. The working solution splits them into separate blocks that stay visible together:
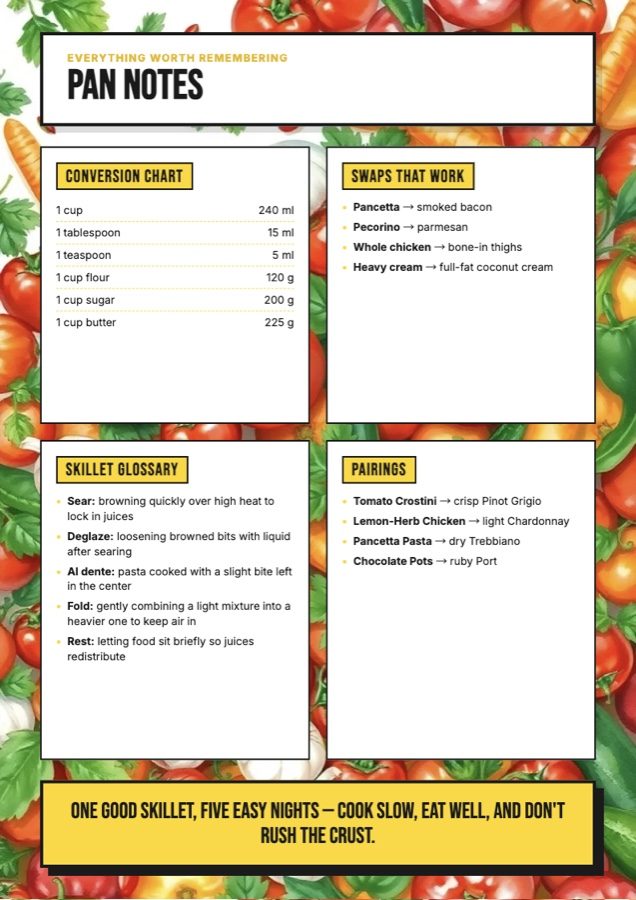
The second constraint is that a cookbook is read non-linearly — people jump to a recipe, cook it, come back weeks later. That means the reference material needs its own designed pages, not a paragraph buried at the end:
There is a third requirement specific to this format, and it is worth testing before you commit to any tool: the numbers must survive exactly. Quantities, temperatures and timings — 300 g, 40 g, 15 minutes — carry the entire value of a recipe. In our own review of long cookbook projects, altered or lost source detail was one of the most damaging failure modes users hit, because unlike a layout problem it is not visible by looking at the page. Whatever route you take, check a few recipes against your originals line by line before printing a hundred copies.
To build one, the AI cookbook maker applies this recipe-page system directly; if your recipes are already in a document, PDF to Booklet takes them as they are. The booklet shown above is The Sunday Skillet.
7 common booklet design mistakes
- A page count that is not a multiple of 4. Saddle stitch physically cannot do 14 pages. Decide the count early and write to it.
- No gutter. Inside margins that match the outside ones look balanced flat and get eaten by the binding once folded.
- Low-resolution images. Screen images at 72 DPI look sharp on a monitor and visibly soft in print. Work at 300 DPI at final size.
- Too many typefaces. Two is comfortable, three is a stretch, four looks unplanned. Vary size and weight instead.
- Placing key content across the fold. A face or headline centred on the spread's gutter gets creased or swallowed. Keep focal points clear of the centre.
- No page numbers or contents page. Past about twelve pages, a reader cannot navigate without them.
- Letting a tool rewrite content that should have been preserved. If you arrive with finished text, you want layout applied — not your wording edited. Confirm the tool has a way to keep source text intact, and check the output against your original.
Which route should you choose?
A direct answer rather than "it depends":
- You have the content and want it to look designed — use BookletAI. This is the case the whole layer-3 problem describes, and hand-building a grid in another tool is the slow way to solve it.
- Short, visual, screen-first — use Canva, and plan a separate imposition step if it will be printed.
- You only need it folded and stapled correctly — use Word's Book fold. It is free and it works.
- Brand-critical work going to a commercial printer — use InDesign, and budget the time.
If you would rather start from a finished structure than a blank page, the booklet templates library covers magazines, cookbooks, workbooks and reports — each one a complete layout system you can put your own content into.
Frequently asked questions
Why must booklet pages be a multiple of 4?
Because one sheet of paper, folded once, creates four pages — two on the front, two on the back. Saddle-stitched booklets are built from folded sheets, so the total is always divisible by four. If your content runs to 14 pages, you either cut to 12 or expand to 16, commonly with a blank inside back page.
Can I print a booklet directly from Canva?
Not with correct page imposition. Canva exports pages in reading order, but a folded booklet needs pages arranged in printing order — page 1 paired with the last page on the same sheet. The usual workaround is to export a PDF and use Acrobat's booklet printing option or a dedicated imposition tool to reorder the pages before printing.
How do I design an A5 booklet?
An A5 booklet is made from folded A4 sheets. In Word, set Book fold with A4 paper and the finished size becomes A5 automatically. In other tools, create your pages at 148 × 210 mm, keep a slightly wider inside margin for the gutter, and impose two A5 pages per A4 sheet at print time. Remember the multiple-of-four rule still applies.
What size should a booklet be?
A5 is the standard for event programmes, small guides and anything handheld. A4 suits reports, catalogues and portfolios where images need room. US Letter is the North American equivalent of A4. Pick based on how it will be read and posted — postage costs rise sharply above A5.
Can I create a booklet without any design skills?
Yes, provided you use a layout system rather than arranging elements yourself. The devices that make a booklet look designed — a column grid, a consistent type scale, captions, pull quotes, page numbers — are rules, not talent. Either apply them deliberately, or start from a template or tool that already encodes them.
How do I turn an existing PDF into a designed booklet?
Two different things are called this. If you only need the pages reordered for folding, any imposition tool or Acrobat's booklet printing will do it — the design is unchanged. If you want the content redesigned into booklet pages with a proper layout, that requires rebuilding it: PDF to Booklet takes the PDF, restructures the content into sections and applies a page layout system to it.
Conclusion
Learning how to design a booklet is mostly learning that the printing step is the last and easiest part. The result is decided earlier — in the format you commit to, the sequence you plan, and above all the layout system you apply. Every complaint about a booklet looking amateurish traces back to layer 3, and no fold setting can fix it after the fact.
Choose the route that matches what you already have. If your content is written and you want it to look like a publication, start with PDF to Booklet or browse the template library to see the layout systems before you commit.
Sources referenced in this guide include Microsoft's official documentation on creating a booklet or book in Word, Adobe's documentation on imposing documents for booklet printing in InDesign, and discussions in the r/bookbinding community on booklet printing from Canva and Word. Interior pages shown are from booklets produced on BookletAI.